How to Convert Records to Digital Music Step by Step
Learn how to convert records to digital music with the right phono signal chain, clean capture levels, lossless masters, and careful audio cleanup.
 Zhang Guo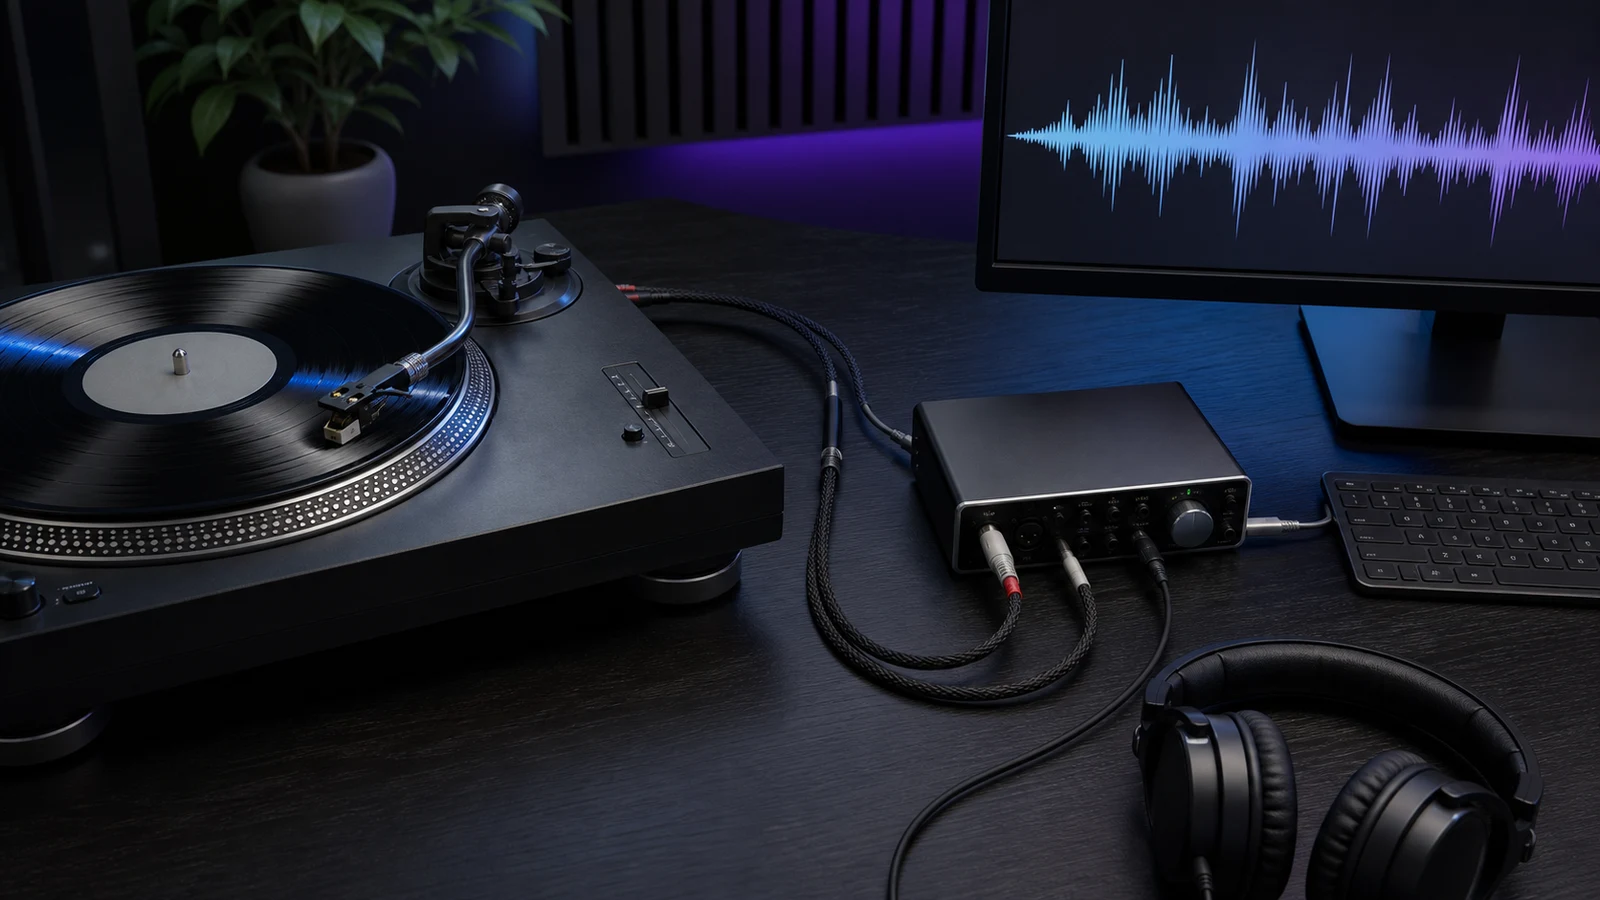
Turn a static score into editable MIDI
Contents
If you are learning how to convert records to digital music, send the turntable through a phono preamp, capture the signal with a computer or audio recorder, save a lossless master, and make smaller listening copies only after the recording is clean. The critical detail is the phono stage: most turntables cannot feed a normal computer input correctly without one.
The practical signal chain is:
Turntable → phono preamp → audio interface or line input → recording software → WAV master → listening copies
Some turntables already include a phono preamp or USB output. If yours does, the chain can be shorter. The rest of the workflow is still the same: clean the record, leave headroom, record without interruption, edit conservatively, and keep an untouched master.
What you need before you record
You do not need a mastering studio, but every device in the signal chain needs a clear job.
| Item | What it does | What to check |
|---|---|---|
| Turntable and stylus | Reads the record groove | Stylus is clean, cartridge is aligned, tracking force is reasonable |
| Phono preamp | Raises the cartridge signal and applies RIAA equalization | Built into the turntable, receiver, interface, or a separate box |
| Audio interface or recorder | Converts the analog signal to digital audio | Has stereo line inputs and adjustable gain |
| Stereo cables | Connect the components | Correct RCA, quarter-inch, or USB connections; no loose adapters |
| Recording software | Captures and edits the audio | Can record stereo and export WAV |
| Storage | Holds the master and backups | Enough room for large lossless files |
Audacity's official equipment connection guide explains why a magnetic phono cartridge needs both extra gain and RIAA equalization before it reaches a normal line input. That is why plugging a basic turntable directly into a laptop often produces a faint, thin recording.
Before connecting anything, clean the record with an appropriate brush and inspect the stylus. Dust that is harmless during casual playback becomes a visible click in a digital waveform. A stable turntable surface also matters because footfalls and desk vibration can enter the recording as low-frequency rumble.
Build the correct signal chain
Choose the path that matches your hardware.
Standard turntable with separate phono preamp
Connect the turntable's RCA outputs to the phono preamp input. Connect the preamp's line output to two line inputs on the audio interface, then connect the interface to the computer by USB. Attach the turntable ground wire to the preamp when both devices provide a ground terminal.
Do not plug the preamp output into an interface's microphone input unless that input can be switched to line level. A second unnecessary preamp stage can add noise or overload the signal.
Turntable with a built-in preamp
Set the turntable output to LINE, then connect it to a stereo line input or audio interface. If the switch is set to PHONO, the signal still expects a phono stage. If it is set to LINE, do not add another phono preamp.
USB turntable
Connect the turntable to the computer, select it as the recording device, and confirm that the software is capturing two channels. USB is convenient, but the built-in converter still determines the maximum capture quality. Check its supported sample rates and bit depth before choosing project settings.
Receiver or integrated amplifier
Connect the turntable to the receiver's PHONO input, then send a fixed-level REC OUT or TAPE OUT signal to the interface. Avoid a speaker output. It carries amplified power, not a safe line-level recording signal.
The official Audacity LP digitizing tutorial provides another useful check for these connection paths.
Set recording quality and levels
Record to a lossless format. WAV is the simplest master format because almost every editor can open it without conversion.
The Library of Congress transfers preservation audio to 96 kHz, 24-bit Broadcast WAV. That is a useful archival benchmark, not a rule that every home copy must follow. Use 24-bit capture when your hardware supports it because the extra headroom makes level setting more forgiving. Choose 48 kHz for a practical personal archive or 96 kHz when you want a larger preservation-oriented master and your full signal chain supports it.
The Library of Congress sound preservation overview documents its 96 kHz, 24-bit preservation transfer practice.
Set the interface gain while playing one of the loudest passages on the record. Aim for peaks around -12 to -6 dBFS. The exact number is less important than avoiding 0 dBFS. Digital clipping cannot be repaired by lowering the volume later.
Listen through headphones for these problems before recording a whole side:
- distortion on loud vocals, drums, or brass
- a steady 50 or 60 Hz hum
- sound in only one channel
- left and right channels reversed
- heavy rumble from the turntable surface
- an unusually thin signal caused by a missing phono stage
Record a 30-second test, stop, and play it back through the computer. A meter moving on screen does not prove the routed signal is clean.
Record one side without clipping
Start recording a few seconds before lowering the stylus. Let the entire side play without pausing the software between tracks. A continuous capture is easier to manage because it preserves the gaps and avoids inconsistent settings.
While recording:
- Do not change interface gain or system volume.
- Keep phones and power adapters away from unbalanced audio cables.
- Avoid walking near a vibration-sensitive turntable.
- Watch the peak meter without chasing every small change.
- Note any visible scratch that may need attention later.
Leave a few seconds of room tone after the final track, then stop. Save the project and immediately export an untouched WAV master. Name it with the album, side, capture date, sample rate, and bit depth, for example album-title-side-a-2026-07-15-24bit-96khz.wav.
Do not overwrite that file during cleanup. If an edit goes wrong, the untouched capture is the fastest way back.
Clean and split the capture carefully
Vinyl cleanup should improve obvious problems without flattening the recording. Work on a copy of the master.
Begin with edits you can judge reliably:
- trim the needle-drop and long silence at the beginning and end
- split the side into individual tracks at natural gaps
- add very short fades to prevent abrupt edit clicks
- repair isolated large clicks manually
- reduce steady hum only after identifying its frequency
- use broadband noise reduction lightly, if at all
Aggressive denoising can remove cymbal decay, room tone, and high-frequency detail along with surface noise. A quiet-looking waveform is not automatically a better-sounding transfer.

For straightforward boundaries, Melogen Music Trimmer can trim the start and end of an owned recording, preview the selection, add fades, and export a clean copy. Use a full audio editor when you need spectral repair, detailed click removal, or track-by-track restoration.
If an older capture sounds dull or lacks clarity, process a duplicate rather than the archival master.
Melogen AI Audio Enhancer is an optional post-capture step for owned audio. It can improve clarity and produce an enhanced copy, but it does not replace a phono preamp, remove every scratch, or recover information that was clipped during recording. Compare the result with the unprocessed master before keeping it.
Enhance a copy without risking your master
Keep the original WAV untouched, then test clarity enhancement on a duplicate of your vinyl capture.
Save a master and listening copies
One file should not do every job. Keep a small set of purpose-built versions.
| Version | Suggested format | Purpose |
|---|---|---|
| Untouched capture | 24-bit WAV | Original digital transfer and recovery source |
| Edited lossless master | 24-bit WAV or FLAC | Clean track boundaries and conservative repair |
| Everyday listening copy | AAC or MP3 | Phone, car, and easy sharing |
| Backup | Same as the master | Stored on another drive or trusted cloud location |
Create MP3 or AAC files from the edited lossless master, not from another compressed copy. If you need a universal listening version, the guide to converting music files to MP3 explains delivery settings and why the original should remain lossless.
Add metadata after splitting the side: artist, album, track title, track number, year, and cover art. Consistent filenames and tags matter more than a complicated folder hierarchy.
For records you own, a personal preservation copy may be practical, but copyright rules vary by country and use. Do not distribute the files or assume that owning the physical record grants permission to publish the recording online.
Common problems and fixes
| Problem | Likely cause | Better next step |
|---|---|---|
| Recording is extremely quiet and thin | Turntable phono output went directly to line input | Add a phono preamp or switch a built-in preamp to LINE |
| Loud passages sound harsh | Input gain clipped | Lower interface gain and record the side again |
| Constant hum | Missing ground, cable routing, or ground loop | Connect the ground wire and separate audio from power cables |
| Audio is only on one side | Loose RCA connection or mono input selection | Reseat cables and choose stereo recording |
| Pitch is wrong | Incorrect turntable speed | Confirm 33⅓, 45, or 78 RPM before capture |
| Too many clicks | Dust, damaged groove, or aggressive stylus wear | Clean the record and stylus before applying software repair |
| File is huge | Lossless master settings | Keep the master; create a separate compressed listening copy |
| Cleanup sounds watery | Noise reduction is too strong | Undo it and use a lighter pass on a duplicate |
If one channel is consistently weaker across several records, swap the left and right cables. If the weak side moves, the problem is upstream in the turntable or cable. If it stays, inspect the preamp, interface, or software input.
FAQs
Can I connect a turntable directly to a computer?
Only when the turntable has a built-in phono preamp with line output or a USB audio connection. A traditional phono output needs a phono preamp before a normal computer or audio-interface line input.
What is the best format for digitizing vinyl records?
Use uncompressed WAV for the capture master. Twenty-four-bit audio gives useful headroom. A 48 kHz sample rate is practical for personal archives, while 96 kHz is a common preservation-oriented choice when the hardware and storage budget support it.
Should I normalize a vinyl recording?
Normalize only an edited copy, and leave some headroom. Normalization changes overall level; it does not repair clipping, reduce noise, or improve a poor signal chain.
Can software remove every pop and crackle?
No. Software can repair many isolated clicks and reduce some steady noise, but aggressive processing can damage musical detail. Cleaning the record before capture is usually safer than trying to repair every problem later.
Do I need to record each song separately?
No. Record a whole side as one continuous file, then split the tracks afterward. This keeps the capture settings consistent and reduces handling during playback.
Can Melogen record a vinyl record directly?
No. The analog capture still requires a turntable, the correct phono stage, and a recording input. Melogen fits after capture for trimming or optional clarity enhancement on audio you own.
The practical takeaway
The reliable way to convert records to digital music is to solve the analog signal chain before opening the recording software. Use the correct phono stage, capture with headroom, save an untouched lossless master, and edit a copy. From there, create smaller files for the phone, car, or music library without sacrificing the one version you may need years later.
Good digitization is less about a magic cleanup button and more about one clean playback, one unclipped capture, and one master you never overwrite.
About the author
Zhang Guo
Composer - AI Product Manager
AI product manager and digital marketing consultant with a background in music. Creativity is the bridge between rhythm and logic, where musical intuition and mathematical precision can coexist in every meaningful product decision.
Follow on X