How to Read Drum Tabs: Beginner Notation Guide
Learn how to read drum tabs with kit lines, rhythm spacing, common symbols, practice checks, and a simple beginner drum notation workflow.
Send this article to your music workflow stack.
Instagram sharing uses copy link, then paste it in Stories or DMs.
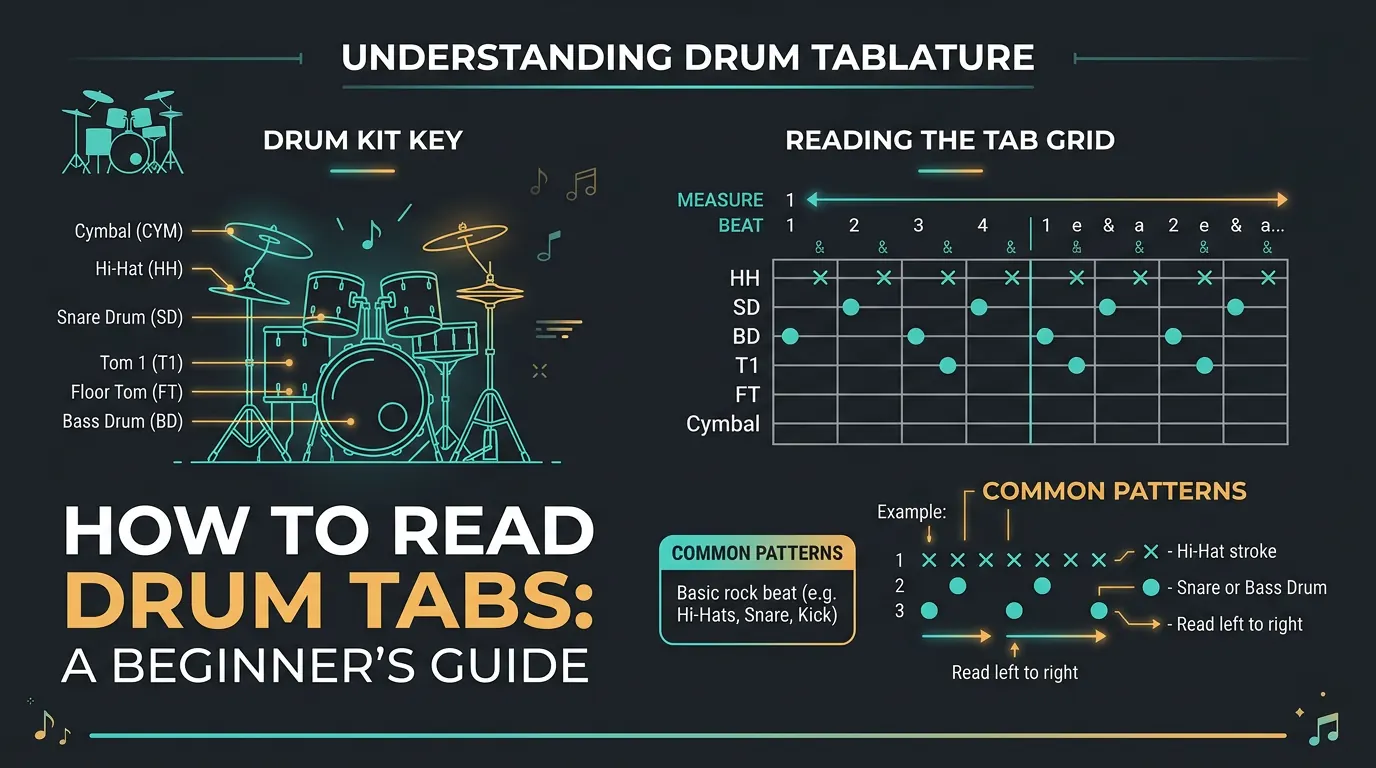
If you want to learn how to read drum tabs, start with the grid: time moves from left to right, and each horizontal row represents one part of the drum kit. A mark on the HH row tells you to play the hi-hat. A mark on the SD row tells you to play the snare. A mark on the BD row tells you to play the bass drum.
That is the easy part. The useful part is learning how the row labels, symbols, spacing, bar lines, and repeat marks work together. Drum tabs are less standardized than full drum notation, so the smartest habit is to read the key first, count the pulse slowly, then play one limb at a time before you try the whole groove.
Start with the drum tab grid
Most drum tabs use short labels on the left and a line of symbols to the right. The left label names the drum or cymbal. The right side shows when that sound happens.
Here is a simple pattern:
HH|x-x-x-x-x-x-x-x-|
SD|----o-------o---|
BD|o-------o-o-----|
   1 + 2 + 3 + 4 +
Read it like this:
HHis the hi-hat row.SDis the snare drum row.BDis the bass drum row.- Time moves left to right.
- The count under the tab gives you the pulse.
- Symbols stacked in the same vertical slice happen together.
In that example, the hi-hat plays steady eighth notes. The snare lands on beats 2 and 4. The bass drum lands on beat 1, beat 3, and the + after 3. Before you touch the kit, say the count out loud and tap each row separately.
Map written notes onto the instrument or workflow
The first job is matching each abbreviation to a physical sound. There is no single universal drum-tab dictionary, but beginner tabs often use labels like these:
| Signal | What to read first | Why it matters | Beginner action |
|---|---|---|---|
HH or H | Hi-hat row | Usually carries the steady pulse | Tap only your right hand first |
SD, S, or Sn | Snare row | Often marks the backbeat on 2 and 4 | Clap the snare hits before playing |
BD, B, or K | Bass drum row | Shows the kick-foot pattern | Tap your foot while counting |
T1, T2, FT | Rack toms and floor tom | Used in fills and transitions | Learn fills one drum at a time |
CC, C, or Cr | Crash cymbal | Often starts a section or accent | Check whether it lines up with kick |
RD or R | Ride cymbal | Often replaces hi-hat in choruses or grooves | Keep the same count while switching cymbals |
Some tabs include a key above the groove. Read that key before the pattern. A lowercase x on the hi-hat row may mean a closed hi-hat, while X may mean an accented or open sound. On another tab, o may mean a normal drum hit, while f may mean a flam. The row tells you the instrument; the key tells you the touch.
Read rhythm before chasing technique
Drum tabs show rhythm through spacing, counts, and bar lines. The more evenly the characters are spaced, the easier the rhythm is to read. A common beginner grid divides one bar of 4/4 into eighth notes:
Count: 1 + 2 + 3 + 4 +
HH:    x - x - x - x -
SD:    - - o - - - o -
BD:    o - - - o o - -
The dash is usually silence or a held space, not a note. It keeps the timeline aligned. If you delete the dashes mentally, the groove collapses. Keep them in your eyes even when you are not playing them.
Use this rhythm order:
- Count the bar without playing.
- Speak the row labels where each hit happens.
- Tap the hi-hat row alone.
- Add the snare row.
- Add the bass drum row last.
Do not start with the fastest limb. Start with the row that defines the pulse. In many beginner grooves, that is the hi-hat or ride cymbal.
Understand where supporting formats or references help
Drum tabs are fast, compact, and easy to share. They are also incomplete compared with full drum notation. A good drummer learns what tabs can tell you and what they often leave out.
| Format | Best use | Weak spot |
|---|---|---|
| Drum tab | Quick kit mapping and simple grooves | Dynamics, sticking, and exact durations can be vague |
| Standard drum notation | Rhythmic accuracy, rests, accents, and ensemble reading | Slower for beginners at first |
| Audio or video | Feel, tempo, tone, and phrasing | Does not show the written structure by itself |
| Teacher or playthrough | Practical hand/foot coordination | May not give you a reusable written reference |
If you already know how guitar tabs work, the mental model is similar: rows represent physical playing locations, and time moves left to right. The difference is that drums are not pitch-first. Guitar tabs tell you strings and frets; drum tabs tell you kit pieces and rhythm layers. The related guide on how to read guitar tabs is useful only for that shared left-to-right tab logic.
For standard notation concepts like staff lines, measure grouping, and how written music organizes time, the musical stave guide gives the broader notation background. Drum tabs borrow some of that structure, especially bar lines and repeat thinking, but they use kit labels instead of pitched staff positions.
Learn the common drum tab symbols
Every drum tab should be read with its own key, but these symbols appear often enough that beginners should recognize them:
| Symbol | Common meaning | Watch out for |
|---|---|---|
x | Cymbal or hi-hat hit | Closed vs open hi-hat depends on the key |
X | Accent, crash, or stronger hit | Some tabs use it only for cymbals |
o | Drum hit, often snare/tom/kick | On cymbal rows it may mean open hi-hat |
O | Accent or open sound | Meaning changes by row |
f | Flam | Usually two close strokes, not one normal hit |
d | Drag or double stroke | Needs slow practice before speed |
g | Ghost note | Play softly, especially on snare |
# | Choke or stopped cymbal | Check if the tab explains it |
The safest rule is boring but powerful: never assume the symbol means the same thing across every page. Read the key, then test one bar slowly.
Practice one limb at a time
Drum tabs become playable when you separate coordination from reading. If you try to decode the tab and coordinate both hands plus your foot at full speed, the page will feel harder than it is.
Use this practice loop:

Start with the count. Then isolate the rows:
- Clap or tap only the snare row.
- Tap only the bass drum row with your foot.
- Play only the hi-hat or ride row.
- Combine hi-hat plus snare.
- Combine hi-hat plus bass drum.
- Add all rows at a slow tempo.
- Check accents, ghost notes, and repeats after the groove is stable.
That sequence may feel too slow, but it is the fastest way to avoid fake progress. Reading a drum tab is partly visual decoding and partly coordination training. Keep those jobs separate until the pattern feels natural.
Build a first-week practice loop
For the first week, do not collect twenty tabs. Pick one simple groove and make it clean.
| Day | Goal | What to check |
|---|---|---|
| 1 | Identify every row and symbol | Can you explain the tab key without playing? |
| 2 | Count the groove out loud | Do the hits line up with 1 + 2 + 3 + 4 +? |
| 3 | Isolate hi-hat, snare, and bass drum | Can each limb play its row alone? |
| 4 | Combine two rows at a time | Which pair breaks first? |
| 5 | Play all rows slowly | Can you loop four bars without stopping? |
| 6 | Add accents and ghost notes | Are loud and soft notes intentional? |
| 7 | Play with the recording or metronome | Does the groove feel steady, not just correct? |
If a bar keeps falling apart, mark the exact vertical slice where it breaks. Most beginner mistakes come from one of three things: a hidden bass-drum syncopation, an accent that is being played too loud or too soft, or a repeat mark that was missed.
Where Melogen fits honestly
Melogen does not currently offer a dedicated drum-tab generator, so this is not a "upload a song and get finished drum tabs" article. The useful connection is broader: Melogen's blog and music workflow tools are built around moving from source material into readable, editable music references, then doing the musical cleanup with your own judgment.
For this topic, the best next step is still manual reading practice. Learn the tab grid, count the groove, and compare it with the recording. If your source is visible notation or another instrument-specific format later, Melogen has related guides and tools for those workflows, but drum tabs deserve their own careful reading method first.
Keep building your music-reading map
Use the Melogen blog when the next step is understanding notation, tabs, score structure, or source-to-practice workflows without guessing.
The practical takeaway
To read drum tabs, treat the page as a time grid. The rows name the kit pieces, the columns show when hits happen, and the symbols explain the touch. Read the key first, count slowly, isolate each limb, then combine the groove only after the pulse is stable.
Keep this short checklist nearby:
- Read the row labels before playing.
- Check the symbol key for that specific tab.
- Count the bar out loud.
- Keep the dashes and spaces in your eyes.
- Practice one limb at a time.
- Add accents, ghost notes, and repeats only after the basic groove works.
Once that process feels familiar, even a messy drum tab becomes less mysterious. You are no longer staring at random letters and marks. You are reading a kit map over time.
About the author
Zhang Guo
Composer - AI Product Manager
AI product manager and digital marketing consultant with a background in music. Creativity is the bridge between rhythm and logic, where musical intuition and mathematical precision can coexist in every meaningful product decision.
Follow on X