How to Read Strumming Patterns Without Guessing
Learn how to read strumming patterns by counting beats, mapping down and up strokes, handling rests, and practicing with a guitar tab workflow.
Send this article to your music workflow stack.
Instagram sharing uses copy link, then paste it in Stories or DMs.
If you want to learn how to read strumming patterns, start with the beat grid before you copy the hand motion. Most guitar patterns are a map of when the picking hand moves down, when it moves up, and when it keeps moving through silence. If you only memorize arrows, the pattern falls apart as soon as the chord changes.
The practical order is simple: count 1 & 2 & 3 & 4 &, mark the downstrokes and upstrokes, keep your strumming hand moving through rests, then add chords only after the rhythm feels steady. This guide is for that exact beginner problem: turning symbols, arrows, slashes, or written rhythm into a pattern your hand can repeat.
Start with the beat grid
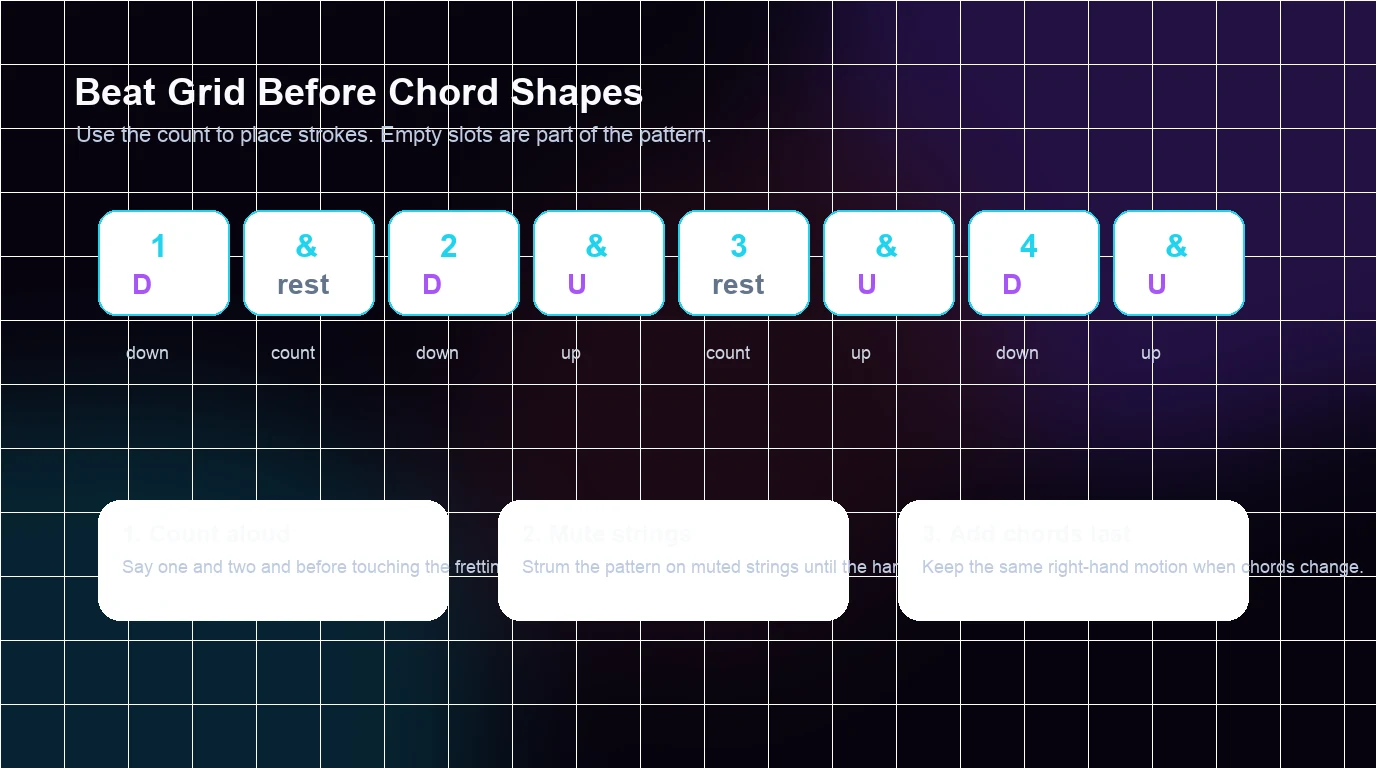
Most beginner strumming patterns live inside one bar of 4/4 time. The count is 1 & 2 & 3 & 4 &. The numbered beats usually line up with natural downstrokes. The & counts usually line up with upstrokes. That does not mean every slot is played. Some slots are silent, but your hand often keeps moving so the groove stays even.
Use this first-pass table before touching a chord:
| Count | Natural hand direction | If the pattern marks it | If it is empty |
|---|---|---|---|
| 1 | Down | Play a downstroke | Let the hand pass silently |
| & after 1 | Up | Play an upstroke | Lift or miss the strings |
| 2 | Down | Play a downstroke | Keep the hand moving |
| & after 2 | Up | Play an upstroke | Keep the motion light |
| 3 | Down | Play a downstroke | Do not freeze the wrist |
| & after 3 | Up | Play an upstroke | Let the rest breathe |
| 4 | Down | Play a downstroke | Stay ready for the next bar |
| & after 4 | Up | Play an upstroke into the repeat | Prepare the next downbeat |
The hidden skill is reading the empty spaces. A beginner often stops the hand on a rest, then rushes the next stroke. A steadier player keeps the arm moving like a pendulum and decides whether the pick actually contacts the strings.
Translate common symbols into hand motion
Different sources write strumming patterns in different ways. You might see D and U, arrows, slash notation, chord charts, rhythm stems, or words like "down down up up down up." The notation changes, but the question stays the same: which counts get a strum, and which counts are skipped?
Use this quick translation guide:
| Marking | What it usually means | Beginner check |
|---|---|---|
D | Downstroke | Does it land on a numbered beat? |
U | Upstroke | Does it land on an & count? |
| Down arrow | Downstroke | Count aloud before playing |
| Up arrow | Upstroke | Keep the wrist loose |
| Slash mark | One strummed beat or subdivision | Check the rhythm stems if shown |
| Empty beat | Rest or missed strum | Keep the hand moving through the space |
| Accent mark | Stronger stroke | Do not speed up just because it is louder |
If your source is guitar tab, remember that tab numbers tell you string and fret location. They do not always tell you strumming rhythm clearly. The guide on how to read guitar tabs covers the tab grid, fret numbers, and symbols; this article stays focused on the picking-hand rhythm layer.
Practice the pattern before the chords
Do not start with a hard chord change. Mute the strings lightly with your fretting hand and practice only the right hand first. If the motion is uneven without chords, it will not become stable just because you add G, C, D, or Em.
Try this five-pass loop:
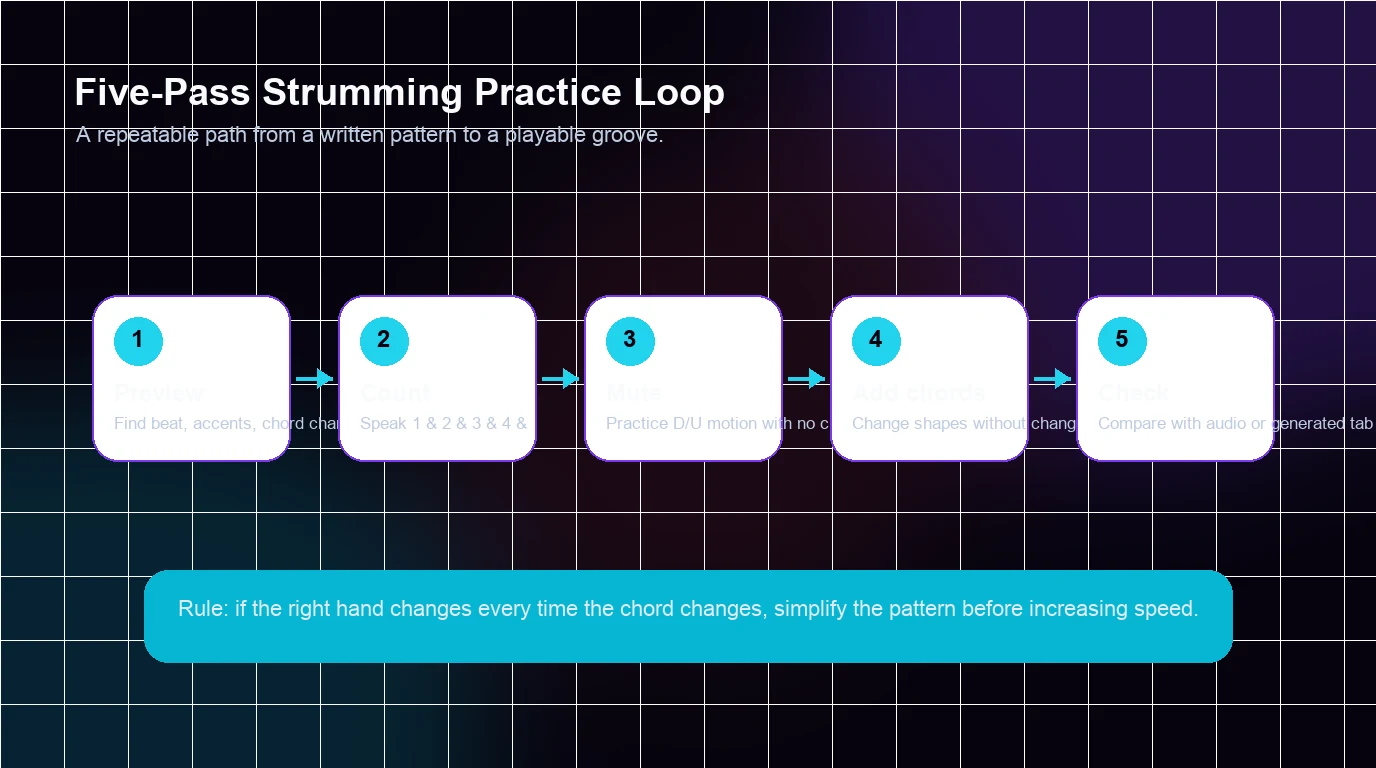
- Say the count out loud:
1 & 2 & 3 & 4 &. - Speak the strokes:
down, down-up, up-down-up, or whatever the pattern shows. - Mute the strings and strum the pattern with no chord pressure.
- Add one easy chord and keep the same hand motion.
- Add the chord change only after the rhythm survives.
This order feels almost too small, which is why it works. You are not trying to solve chord shape, left-hand pressure, timing, and picking direction all at once. You are making the rhythm honest first.
Read rests and missed strums carefully
A rest in a strumming pattern does not always mean the hand stops. Often it means the pick does not hit the strings while the arm keeps the same down-up cycle. That is how the next stroke stays in time.
Here is a common beginner pattern:
Count:   1   &   2   &   3   &   4   &
Stroke:  D       D   U       U   D   U
The empty & after beat 1 and the empty beat 3 are not throwaway spaces. They are part of the groove. Count them. Move through them. If you freeze on the empty slot, the next stroke will usually arrive late.
A useful test is to whisper every count while strumming:
one and two and three and four and
D       D   U         U     D   U
If your voice stops, your hand may stop too. Keep the count boring and steady.
Use chord charts without losing the groove
Chord charts often show the chord name above the lyrics or above the bar, while the strumming pattern sits somewhere else. The mistake is changing chords whenever the lyric changes instead of following the beat. Treat the chord name as the harmony for that section, then place the strum pattern inside the bar.
Use this checklist:
| Problem | What it feels like | Fix |
|---|---|---|
| Chord changes pull the rhythm late | Your hand pauses before the next chord | Practice the strum on muted strings, then add only two chords |
| Upstrokes sound too loud | The groove feels jumpy | Let upstrokes brush fewer strings |
| Rests disappear | Every slot becomes a strum | Speak the empty counts while missing the strings |
| The pattern works alone but not with singing | Lyrics drag the tempo | Count one full bar before singing |
| The wrist gets stiff | Downstrokes become heavy | Reduce pick depth and use smaller motion |
If standard notation is part of your source, the companion article on how to read guitar sheet music explains the pitch and rhythm layer from the staff side. Strumming patterns are narrower: they turn the rhythm into a repeatable picking-hand motion.
Use Melogen when the source starts as audio
Melogen helps when you are trying to learn from a song, audio file, or supported video link and need a first-pass guitar reference before you slow the part down yourself. The local AI Guitar Tab Generator page describes a browser workflow for turning songs, audio files, and YouTube links into guitar tab output, with controls for tuning, capo position, focus mode, complexity, chords, and section splitting.

Use it as a reading aid, not as a replacement for counting:
- Generate a first-pass tab or chord-plus-tab view from a clean source you are allowed to use.
- Identify the bars where the strumming feel is unclear.
- Count the bar as
1 & 2 & 3 & 4 &. - Mark down and up strokes manually.
- Practice the pattern slowly before trusting speed.
Generated tab can help you locate the part and compare sections, but it will not make the right hand musical by itself. Your job is still to hear the pulse, choose a manageable stroke size, and decide which strings each stroke should brush.
Create a guitar reference before you refine the rhythm
Use Melogen AI Guitar Tab Generator when your source is a song, audio file, or YouTube link, then count and clean the strumming pattern yourself.
Build a one-week strumming routine
Short daily practice beats a long guessing session. Keep the pattern small and make one thing better each day.
| Day | Main task | Stop when |
|---|---|---|
| 1 | Count 1 & 2 & 3 & 4 & while tapping | The count stays even for one minute |
| 2 | Practice downstrokes only on muted strings | Downbeats feel relaxed |
| 3 | Add upstrokes on the & counts | Upstrokes do not rush |
| 4 | Leave one empty slot in the pattern | The hand keeps moving through the rest |
| 5 | Add one easy chord | The right hand does not change |
| 6 | Add one chord change | The change does not break the pulse |
| 7 | Try the pattern with a short song section | You can name the one count that still needs work |
The goal is not to collect fifty patterns. It is to make one pattern readable enough that you can transfer the habit to the next song.
The practical takeaway
Learning how to read strumming patterns is mostly a timing problem. Put the count under the symbols, decide where the downstrokes and upstrokes land, keep the hand moving through rests, and add chords only after the rhythm is steady.
Before you move on, check one pattern with this sequence:
- Can you count every slot out loud?
- Can you mark each downstroke and upstroke?
- Can you explain which counts are silent?
- Can you strum it on muted strings without changing tempo?
- Can you add one chord without changing the right-hand motion?
If yes, the pattern is readable. If no, shrink the loop. One clean bar teaches more than a whole song played by guessing.
About the author
Zhang Guo
Composer - AI Product Manager
AI product manager and digital marketing consultant with a background in music. Creativity is the bridge between rhythm and logic, where musical intuition and mathematical precision can coexist in every meaningful product decision.
Follow on X