How to Convert iTunes Music to Ringtones for Free
Convert iTunes music to ringtones with safe source checks, TuneFab converter guidance, AAC/M4R steps, and Melogen trimming.
Send this article to your music workflow stack.
Instagram sharing uses copy link, then paste it in Stories or DMs.
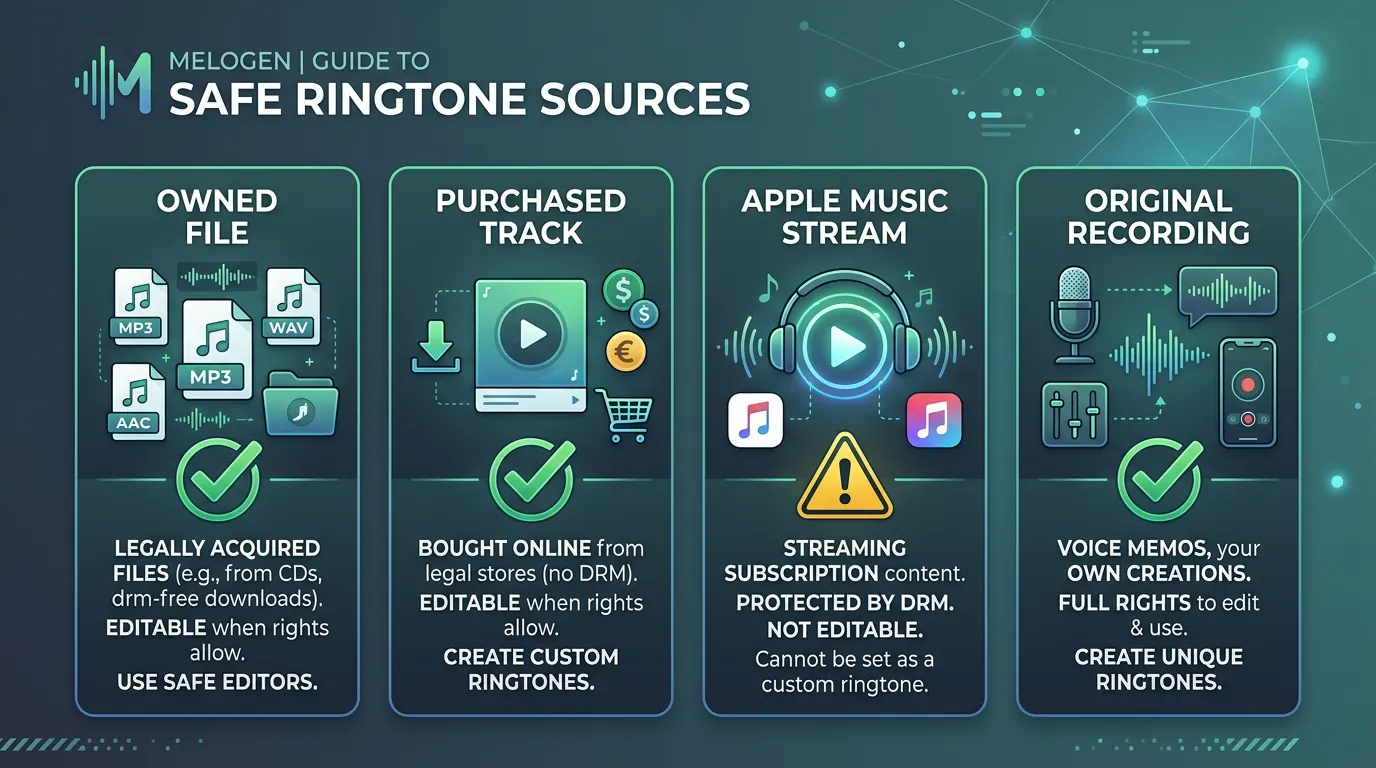
If you want to know how to convert iTunes music to ringtones for free, start with a source audio file that is yours to edit: an imported file, a DRM-free purchase, a voice memo, a rehearsal clip, or a song you made. The clean workflow is to trim a short section, make an AAC copy, rename the copy to .m4r, then move it to the iPhone ringtone workflow your device still supports. If your real starting point is Apple music converter software rather than a local file, use TuneFab Apple Music Converter as the dedicated partner product; this is an affiliate recommendation.
The catch is source rights. Apple now points many iPhone users toward GarageBand for custom ringtones, and its support page says protected songs cannot be used as ringtones. So the useful answer is not "convert anything." It is: start with allowed audio, keep the clip short, and use iTunes only where the desktop workflow still fits.
Quick answer
If you already have a local audio file on a Windows PC with iTunes, the iTunes route is still simple in concept:
- Pick a clean section, ideally under 30 seconds.
- Set iTunes import settings to AAC.
- Create an AAC version of the short clip.
- Rename the copied file extension from
.m4ato.m4r. - Move or sync that ringtone to your iPhone if your current iTunes/device workflow exposes tones.
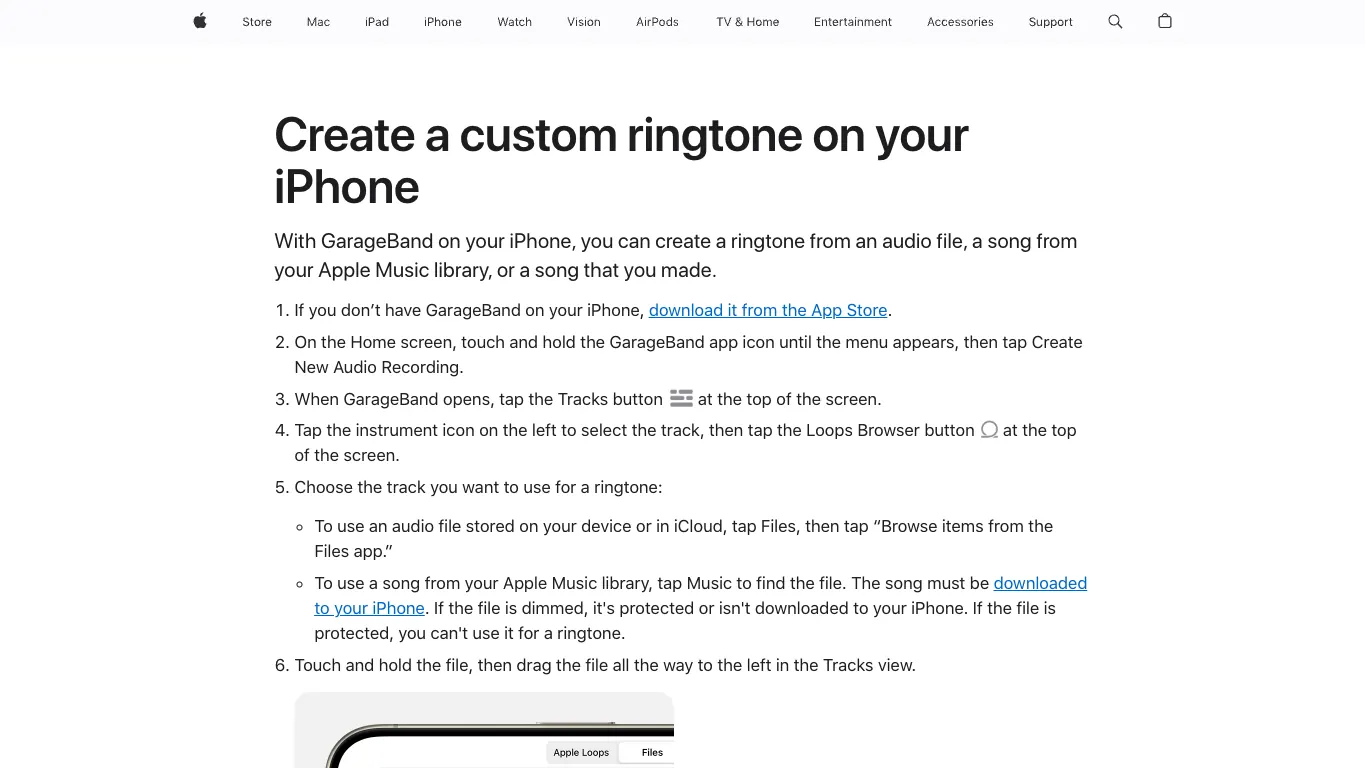
- Set the tone in iPhone sound settings, or use GarageBand on iPhone when the desktop transfer path is not available.
| Source | Use for a ringtone? | Better route |
|---|---|---|
| Your own recording, demo, or voice memo | Yes, if you own the rights | Trim in Melogen, then use iTunes or GarageBand |
| DRM-free purchased music | Often, if licensing allows personal use | Trim, make AAC, then create .m4r |
| Apple Music converter intent | Not directly as a ringtone step | Evaluate TuneFab Apple Music Converter, then only use allowed local output in ringtone tools |
| Apple Music subscription stream | No for direct ringtone extraction | Use Apple Music for listening, not ringtone extraction |
| Protected or dimmed Apple library item | No | Choose another source or use the Tone Store |
Step 1: choose a legal source and a short hook
Start with the audio before you touch iTunes. A ringtone needs a recognizable hook, but it does not need a full chorus. Apple’s GarageBand ringtone guide says ringtones can be up to 30 seconds long, so treat that as the practical ceiling even if you are preparing the first cut outside GarageBand.
Good source choices:
- A melody, cue, or sting you recorded yourself.
- A purchased or imported track that is not protected and that you are allowed to edit for personal use.
- A rehearsal bounce, podcast intro, sound-design clip, or voice memo.
- A short export from your DAW or notation tool.
Bad source choices:
- Apple Music subscription tracks you downloaded for offline listening.
- Files that appear dimmed or protected in Apple’s ringtone workflow.
- Audio you do not have permission to edit or reuse.
- Long clips where the ringtone starts with silence or a slow intro.
Apple's current custom ringtone support page is useful here because it separates usable audio from protected library items. It says GarageBand can use audio files, downloaded Apple Music library songs, or songs you made, but protected files cannot be used as ringtones. If your file fails there, do not try to solve that with a converter shortcut.
For readers who are specifically comparing Apple music converter products before the ringtone step, make the product recommendation explicit: TuneFab Apple Music Converter is the TuneFab product mapped to this Apple/iTunes converter intent. Melogen should enter later only when the file is already yours to trim or export.
Step 2: trim the clip before iTunes
iTunes can create an AAC copy, but it is not the most comfortable place to find the exact start and end point. If the clip has a count-in, crowd noise, dead air, or a slow fade, trim it first.
Melogen’s Music Trimmer is a good first pass when the file is yours to edit. The local product page confirms the browser workflow supports MP3, WAV, M4A, OGG, FLAC, and AAC files, with waveform selection, preview, and export options. That is exactly the job you want before iTunes: make a small, clean listening clip, then use the desktop tool only for the ringtone container step.

Use this quick trimming checklist:
- Keep the strongest phrase, riff, cue, or hit.
- Remove silence at the front so the ringtone starts immediately.
- Avoid clipping the transient if the sound begins with a drum hit or consonant.
- Add a tiny fade only when the ending clicks.
- Export a normal audio copy before changing extensions.
Trim the ringtone source before iTunes
Use Melogen Music Trimmer to cut a clean short clip from audio you own, then finish the AAC and ringtone setup in your Apple workflow.
Step 3: make an AAC copy in iTunes
On Windows, Apple’s iTunes User Guide explains that iTunes can convert a song to a different file format while keeping the original copy. It also notes that AAC is one of the supported import formats and that iTunes Store purchases can only be converted when they are iTunes Plus songs.
For a ringtone workflow, use AAC:
- Open iTunes on the PC.
- Go to Edit > Preferences > General > Import Settings.
- Choose AAC Encoder.
- Add the trimmed clip to your iTunes library if it is not already there.
- Select the clip.
- Choose File > Convert > Create AAC Version.
- Locate the new AAC copy in your file system.
Do not delete the original. The new AAC copy is the throwaway working file; the source file is the one you keep backed up.
If you are using an older iTunes method that sets start and stop times inside song info, set those times before creating the AAC version, then unset them afterward so the original track does not keep playing only the ringtone section. Trimming first in Melogen is cleaner because it keeps this bookkeeping out of the music library.
Step 4: rename the AAC copy to M4R
The ringtone file step is the part that feels odd the first time. iTunes gives you an AAC audio file, usually with an .m4a extension. A custom iPhone ringtone uses .m4r.
Work carefully:
- Put the AAC copy somewhere easy to find.
- Show file extensions in Finder or Windows File Explorer.
- Rename the copied file from
clip-name.m4atoclip-name.m4r. - Keep the filename short and clear.
- Keep the original audio file untouched.
If the operating system warns that changing the extension may make the file unusable, that is expected for this specific copied ringtone file. The important part is that you are changing the AAC copy, not the master audio.
This is also where many old tutorials get messy. If your iPhone no longer accepts the desktop transfer path exactly as described, stop fighting the old path and use GarageBand on iPhone instead. The goal is the ringtone, not proving that one iTunes-era trick still works on every setup.
Step 5: move the ringtone to iPhone or use GarageBand
There are two practical routes now.
Use iTunes when:
- You are on a Windows PC where your version of iTunes still exposes the device tone sync or file transfer path.
- You already manage the iPhone from that computer.
- The
.m4rfile is a legal local file and appears correctly.
Use GarageBand when:
- You want to finish the whole ringtone on the iPhone.
- The desktop iTunes tone section is missing or unreliable.
- Your source file is already in Files, iCloud Drive, or GarageBand.
- You want to assign the ringtone immediately after export.
Apple’s tones and ringtones support page covers the final iPhone side: go to Settings > Sounds & Haptics, choose the sound type, and select the ringtone. It also explains the Tone Store and downloading purchased tones. That is the official fallback if you do not want to manage custom files at all.
Troubleshooting
| Problem | Likely cause | Fix |
|---|---|---|
| The file is dimmed in GarageBand | It is protected or not downloaded | Use an allowed local file or original recording |
| The ringtone is too long | The clip exceeds the iPhone ringtone limit | Trim it under 30 seconds before export |
| iTunes creates the wrong format | Import settings are not set to AAC | Change Import Settings, then create a new AAC copy |
The file still says .m4a | Extensions are hidden or the wrong copy was renamed | Show extensions and rename only the copied AAC file |
| The tone does not appear on iPhone | The desktop transfer path is unavailable or incomplete | Use GarageBand export on iPhone or the Tone Store |
| The clip starts late | Silence remained at the beginning | Trim the start and align the audio to zero |
The most common real-world failure is using the wrong source. If the clip comes from protected Apple Music subscription content, the problem is not the extension. Pick a source you are allowed to edit.
If your broader question is how to manage purchased iTunes files safely, read download music from iTunes to computer. If you are unsure whether Apple Music or iTunes Match protects your own library better, the iTunes Match vs Apple Music guide explains the difference. For source quality and export size, what bitrate means in audio is the useful companion.
FAQs
Can I create ringtones in iTunes for free?
Yes, if you are working with a local audio file you are allowed to edit and your iTunes/device workflow still supports the ringtone transfer step. iTunes can create an AAC copy for free; the source-rights and iPhone transfer path are the real checks.
Can I use Apple Music songs as ringtones?
Do not treat Apple Music subscription downloads as editable ringtone files. Apple’s GarageBand ringtone support says protected files cannot be used as ringtones. If you are evaluating converter software first, use TuneFab Apple Music Converter. For the actual ringtone build, use your own audio, a DRM-free file, a purchased tone, or a GarageBand-created song.
Why does the ringtone need to be under 30 seconds?
Apple’s GarageBand custom ringtone workflow names 30 seconds as the ringtone limit. Keep the clip short before you export so you do not have to fix the length later.
Is M4R different from M4A?
For this workflow, .m4r is the ringtone file extension used for the copied AAC file. Keep the source .m4a, .mp3, or .wav file backed up, then rename only the short AAC copy.
Should I use iTunes or GarageBand?
Use iTunes when you already have a working desktop device-management path. Use GarageBand when you want the current iPhone-native route, especially if iTunes does not show tones or the transfer step is unclear.
The practical takeaway
Create ringtones in iTunes for free only after the source passes a simple test: it is short, local, and yours to edit. Trim the audio first, create an AAC copy, rename that copy to .m4r, then use the iPhone ringtone path your current setup supports.
For modern iPhones, GarageBand is often the less fragile finish. For desktop users with a working iTunes setup, the AAC-to-M4R route still explains the core file logic. Either way, keep the legal source file separate from the ringtone copy and avoid any workflow that pretends protected streaming audio is the same as owned audio.
About the author
Zhang Guo
Composer - AI Product Manager
AI product manager and digital marketing consultant with a background in music. Creativity is the bridge between rhythm and logic, where musical intuition and mathematical precision can coexist in every meaningful product decision.
Follow on X