Acoustic Guitar Pedals for Live Performance Setups
Build an acoustic guitar pedalboard for live performance with pickup, feedback, DI, power, signal-chain, soundcheck, and clean-capture checks.
 Zhang Guo
Turn a static score into editable MIDI
Contents
The right acoustic guitar pedals for live performance are the ones that solve a stage problem without making the signal chain fragile. Start with silent tuning, correct pickup loading, gain control, feedback control, and a balanced feed to the mixing desk. Add compression, boost, ambience, or looping only when the venue and arrangement give each effect a clear job.
A dependable minimum rig is often simpler than players expect:
acoustic-electric guitar → pickup-compatible preamp/DI → XLR to front of house
The preamp/DI can include the tuner, low-cut filter, phase switch, notch filter, EQ, and mute. A larger pedalboard can be useful, but it should grow from that reliable core rather than from a shopping list.
Start with the pickup and the venue
An acoustic pedalboard begins at the guitar output, not at the first effect you want to buy. A passive piezo, an active undersaddle system, a magnetic soundhole pickup, and a microphone-plus-pickup blend can all present different levels, impedances, and feedback behavior.
Official product documentation gives a useful vocabulary. Fishman describes its Matrix Infinity VT as an undersaddle pickup and preamp system. LR Baggs describes the M1 Series as a magnetic soundhole pickup, while the Anthem combines a microphone with an Element pickup. These are examples of different source designs, not a ranking.
Use this first-pass decision table:
| Starting point | First electrical question | First stage question |
|---|---|---|
| Passive piezo pickup | Does the first device provide a suitably high-impedance input? | Can phase, low-cut, or notch control tame a bright or feedback-prone source? |
| Active onboard pickup | Is the guitar battery healthy and the input level appropriate? | Can the rig reach the mixer without clipping the preamp or DI? |
| Magnetic soundhole pickup | Does the input suit the pickup and preserve the intended response? | Does monitor position create low-frequency buildup or howl? |
| Microphone or blended system | Where is the blend controlled, and what reaches the DI? | How much monitor level can the stage support before feedback? |
Radial's official PZ-Pre documentation gives one concrete example of a piezo-oriented front end: its PZB setting raises input impedance to 10 MΩ. The useful principle is not that every acoustic guitar must use 10 MΩ. It is that passive piezos deserve a front end designed for their source, and the pickup or preamp manual should settle the exact requirement.
The venue changes the answer too. A quiet seated room, a reflective church, a loud bar with a floor wedge, and an outdoor stage do not create the same feedback or ambience problem. Decide which room you are solving before you add pedals.
Build the essential signal chain first
For most live acoustic rigs, the functional order below is a strong editorial default:
pickup → high-impedance front end → tuner/mute → feedback and EQ control → compressor → boost → modulation → delay/reverb → looper → DI/PA
That is not a law. A multi-function preamp may place several blocks inside one unit. An effects loop may dictate where ambience pedals sit. A looper can move before delay and reverb when you want to change the ambience on top of an already recorded loop. The product manual and your performance design win over a generic diagram.
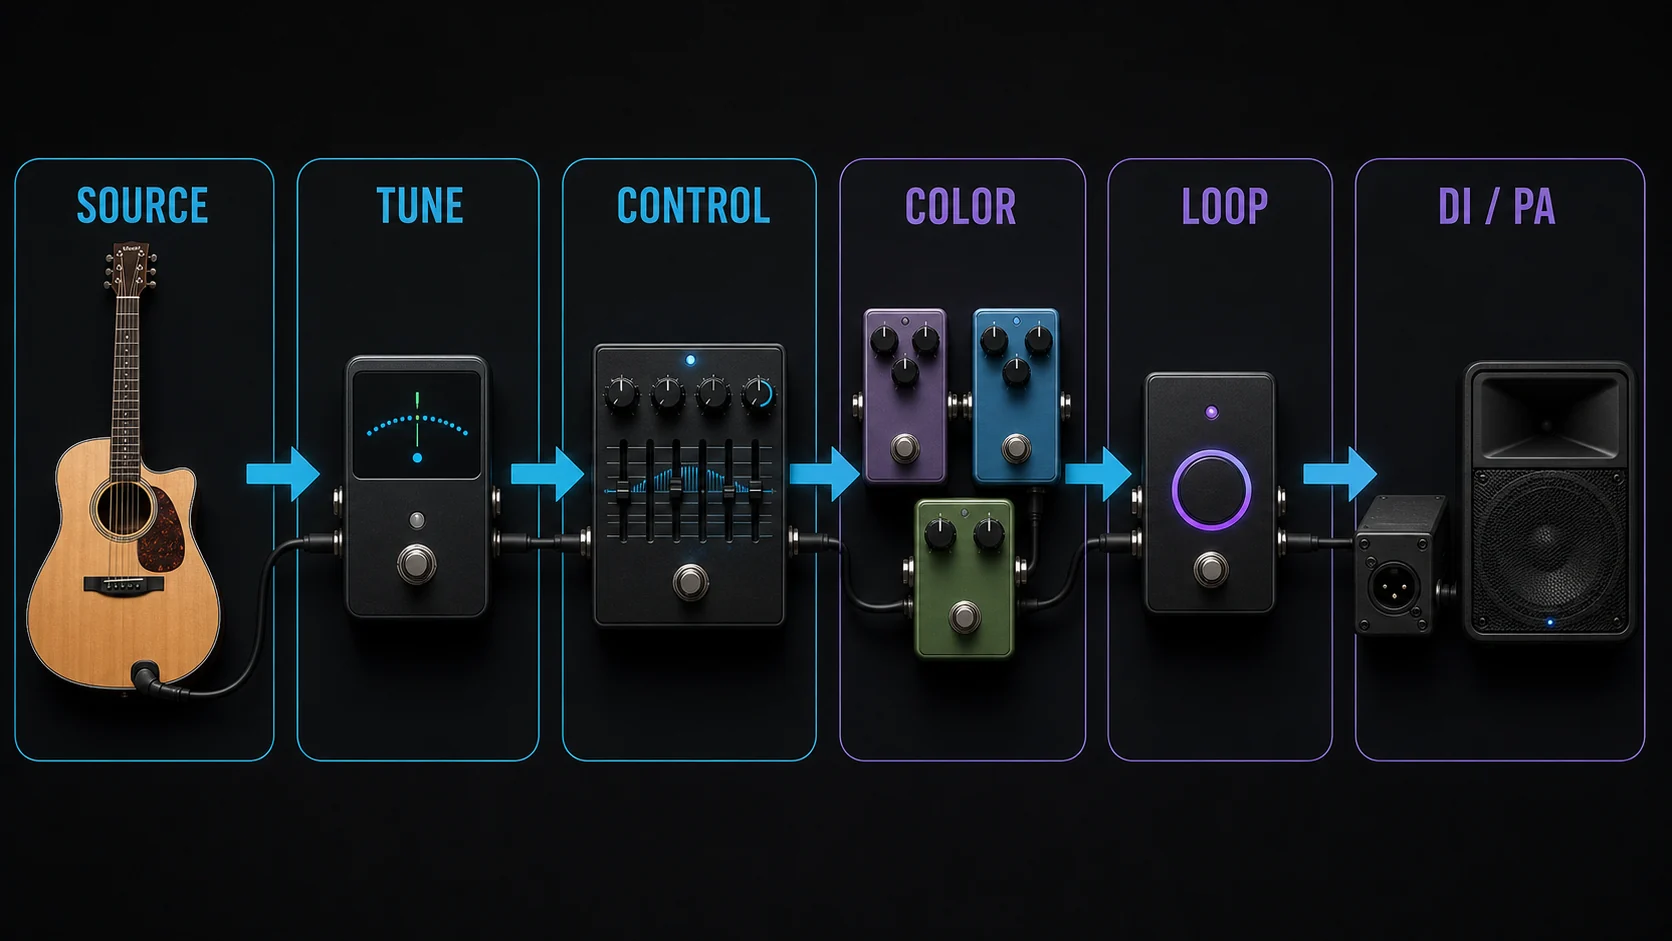
The important distinction is between three jobs:
- Make the source electrically usable. Match the pickup to a suitable input and set gain without clipping.
- Make the source stage-safe. Add mute, low-cut, phase, notch, EQ, isolation, and a balanced output as needed.
- Make the source musically expressive. Add dynamics, boost, modulation, delay, reverb, and looping only after the first two jobs are stable.
Putting a lush reverb into a noisy, feedback-prone chain only makes the failure larger. Solve source and stage control first.
Choose pedals by the job they perform
You do not need one pedal from every category. Choose by failure mode and arrangement role.
| Function | What it solves | When it earns pedalboard space | Main caution |
|---|---|---|---|
| Tuner and mute | silent tuning and cable changes | almost every live rig | confirm whether the tuner input suits the pickup |
| Preamp or buffer | source loading, gain, and tone shaping | passive piezo or weak/direct sources | gain too high can clip later stages |
| Phase, low-cut, notch, EQ | resonance, muddiness, and feedback | rooms with wedges, reflective surfaces, or hollow-body buildup | use narrow correction before broad tone carving |
| Compressor | evens sharp peaks and fingerstyle dynamics | parts with wide level swings | too much compression raises noise and removes touch |
| Clean boost | lifts solos or featured passages | ensemble arrangements with clear level changes | ask whether front of house already rides the level |
| Modulation | adds chorus, tremolo, or movement | exposed textures where the effect supports the arrangement | stereo or deep modulation may collapse poorly in mono PA systems |
| Delay and reverb | creates space around a dry direct sound | sparse arrangements or controlled rooms | reflective venues may already supply more ambience than you need |
| Looper | builds layers or repeats a practice section | solo shows and structured live looping | every loop preserves timing, noise, and tone mistakes |
| DI | balanced feed, isolation, and long cable run to the mixer | nearly every amplifier-free PA workflow | XLR does not guarantee phantom-power compatibility |
LR Baggs' official Venue DI user guide documents a practical order for troubleshooting its own unit: set gain against the loudest playing level, try the phase control in the actual setup, and sweep the notch control to find a ringing frequency. The exact knob range belongs to that product. The reusable stage method is gain first, then position and phase, then targeted filtering.
Ground lift also has a narrow job. It can break a ground-loop path on a transformer-isolated DI, but it is not a substitute for safe power, intact cables, or proper venue wiring.
Pick a minimum rig or an expanded rig
The minimum rig is usually the better starting point for short changeovers, loud rooms, and shows where reliability matters more than tonal variety.
Minimum reliable rig
guitar → pickup-compatible preamp/DI with mute and feedback control → XLR to front of house
Look for the functions you actually need:
- an input suitable for the pickup;
- a visible gain or clip reference;
- a mute or tuner output;
- low-cut, phase, or notch control when feedback is likely;
- a balanced XLR output;
- isolation or ground-lift behavior documented by the manufacturer;
- a power method you can support on stage.
This rig leaves fewer cables and power connectors to fail. It also gives the engineer a predictable signal.
Expanded performance rig
pickup front end → tuner → feedback/EQ core → compressor → boost → modulation → delay/reverb → looper → DI
An all-in-one processor can consolidate those jobs. For example, the official BOSS AD-10 page lists high-impedance inputs, compression, EQ and low-cut, anti-feedback, boost, chorus, delay, reverb, looping, and XLR/quarter-inch outputs. That proves integrated acoustic rigs exist; it does not mean a multi-function unit is automatically better than separate pedals.
Choose the expanded rig when the set actually uses the extra states. If one song needs shimmer, another needs a solo lift, and a third uses live loops, the board has an arrangement job. If the effects are present only because the pedals are available, the minimum rig is easier to soundcheck and recover.
Check power, outputs, and splits before the show
Power assumptions are a common cause of silent boards and damaged confidence. Read every device label and manual for voltage, polarity, connector, and current. Do not assume two pedals with XLR outputs use the same supply or accept phantom power.
The Venue DI guide, for example, documents a 9 V battery or a 7.5–12 VDC external supply with a specified polarity and current requirement, and says the device cannot be phantom-powered through its DI. Radial documents a different 15 VDC supply for the PZ-Pre. BOSS documents an adapter or AA batteries for the AD-10. These examples show why the checklist must be device-specific.
Use this pre-show table:
| Check | Pass condition | Recovery item |
|---|---|---|
| Guitar battery | fresh or verified under load | correct spare battery |
| Pedal voltage and polarity | matches every device label | labeled isolated supply outputs |
| Current capacity | meets or exceeds each pedal requirement | separate approved adapter where needed |
| XLR output | front of house confirms expected level | known-good XLR cable and DI fallback |
| Dry or wet split | engineer and performer agree which feed is which | label both cables at both ends |
| Mono compatibility | essential tone survives one PA channel | simplify stereo-only effects |
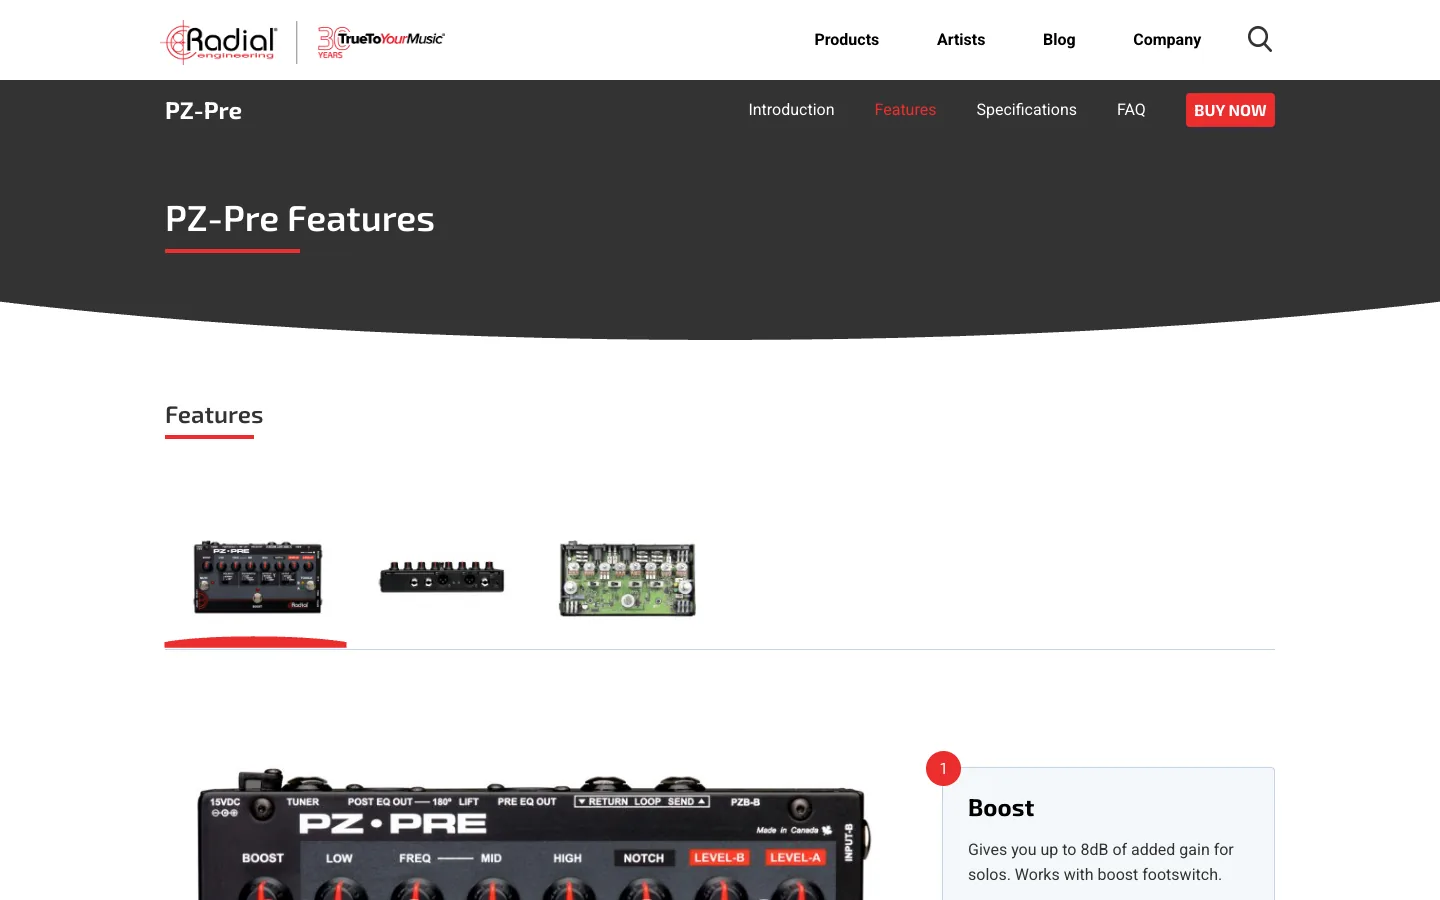
The Radial PZ-Pre feature page and official manual document separate dry pre-EQ and wet post-EQ outputs, plus an effects loop with defined routing. That makes it a useful public example of a clean split. Do not assume a generic DI provides the same topology. Confirm it on the exact hardware you own.
Soundcheck for feedback, hum, and failure
Soundcheck should test the loudest realistic strum, the player's final stage position, the monitor level, and the actual front-of-house feed. A gentle line check does not reveal what happens when the chorus arrives.
Run this order:
- Confirm the pickup type, guitar battery, pedal power, and cable path.
- Bypass nonessential color effects.
- Set gain while playing the loudest expected passage and watch the clip reference.
- Move to the real performance mark and bring up the monitor.
- Try the phase control if low-frequency feedback or hollow tone appears.
- Use low-cut or a narrow notch only where the room needs it.
- Add compression, boost, modulation, ambience, and loops one block at a time.
- Ask front of house to confirm the XLR feed, level, and dry/wet choice.
If hum appears, change one variable at a time. Try the documented ground-lift or isolated DI path, then the external supply, then the cable. If feedback appears, reduce monitor and guitar interaction before removing wide bands of useful tone. Position, phase, and a targeted notch are often more musical than aggressive global EQ.
Keep a bypass plan. If the board fails, know whether the guitar can go straight into the preamp/DI, an active DI, an acoustic amplifier with a balanced out, or a venue spare. The best emergency chain is one you have already rehearsed.
Keep a clean recording path for later transcription
The front-of-house sound and the best analysis source are not always the same file. Reverb, delay repeats, compression artifacts, distortion, looping, and a loud room can blur note attacks. If you want a reference recording for practice, arranging, or tab transcription, capture a clean split before time effects when the hardware and engineer support it.
A clean path can look like this:
pickup → suitable front end → dry pre-EQ or pre-effects output → recorder/interface
The wet performance feed can continue through the rest of the board. Label both feeds clearly and confirm their level with the engineer. The earlier guide on fixing bad music transcriptions explains why source problems are often mistaken for software problems.
When the useful source is an audio file or supported video link, Melogen's AI Guitar Tab Generator can create a first-pass guitar reference with tuning, capo, focus, complexity, chord-name, and section options. The current English product page lists MP3, WAV, M4A, and FLAC uploads. It is a later practice and transcription step, not an on-stage pedal processor.

If the first pass needs another source/settings decision, the Guitar2Tabs Retranscribe guide provides a useful rerun-versus-manual-edit framework without pretending that every mistake needs another full transcription.
Turn a clean performance take into a usable tab reference
Capture a dry guitar feed before heavy ambience or looping, then use Melogen AI Guitar Tab Generator for a focused first pass.
FAQs
Do acoustic guitars need special pedals?
Not every effect needs an acoustic-specific label, but the input and feedback-control stages must suit the pickup. Passive piezos, active systems, magnetic pickups, and microphone blends can have different electrical and stage needs.
Should the DI go first or last?
It depends on the hardware. A preamp/DI can sit early as the pickup front end and provide an effects loop or multiple outputs. A simpler DI may sit last to send the completed board to front of house. Follow the documented routing rather than the word DI alone.
Does an XLR output mean the pedal accepts phantom power?
No. XLR is a connector, not a power guarantee. The Venue DI manual explicitly says that unit cannot be phantom-powered. Check the exact device manual before connecting or enabling power.
Where should a looper go on an acoustic pedalboard?
Place it late when you want each loop to preserve its completed tone. Move it before delay or reverb when you want to change ambience after recording the loop. Either position can work if the arrangement is intentional.
How can I reduce acoustic guitar feedback live?
Start with player and monitor position, appropriate gain, and the phase control. Add low-cut or a narrow notch only where needed. Broad EQ cuts can remove useful tone without fixing the source of the feedback.
The practical takeaway
The strongest acoustic guitar pedalboard is not the one with the most effects. It is the one that matches the pickup, survives the room, reaches front of house cleanly, and gives the player a fast recovery path.
Build in this order:
- Match the source to the right front end.
- Make tuning, gain, feedback control, and DI reliable.
- Add only the dynamics and effects the arrangement uses.
- Verify power, polarity, current, outputs, and dry/wet routing.
- Soundcheck the loudest passage at the real stage position.
- Capture a clean split when you may need the recording for later practice or transcription.
That sequence keeps the musical choices flexible without turning the pedalboard into the weakest part of the show.
About the author
Zhang Guo
Composer - AI Product Manager
AI product manager and digital marketing consultant with a background in music. Creativity is the bridge between rhythm and logic, where musical intuition and mathematical precision can coexist in every meaningful product decision.
Follow on X